So you are looking at using one of the most universally accepted ballistic apps in the world. Strelok Pro is arguable the best value-for-money ballistic app available. It even has a free version, albeit slightly limited in function.
I have been using the Strelok Pro version for around 5 years and only really understood many of its functions in the last few months. This prompted me to write a detailed but simplified guide to set up Strelok Pro and use it correctly at the range or in the field.
As I am sure you already know, time at the range is limited, so it is really depressing when you leave the range, knowing that you spent most of your time there figuring out the app. A waste of valuable shooting time to be sure. So to save you that time and hassle, here is a step by step guide broken into the following parts, in order:
- Initial Setup – How to set up the Strelok App
- App Settings
- Measurement Units:
- Entering the rifle, ammunition, and scope data into the Strelok App.
- Scope data
- Bullet and cartridge data
- Zeroing your rifle and entering zero data into the Strelok App
- Bullet speed
- Zeroing weather
- Twist rate and direction
- Using the Strelok App in the field, correctly.
- Target data
- Current weather
I can tell you right now that this is going to be a long one. If you are looking for a specific feature or setting, you might want to search this page by hitting Ctr+F on your keyboard and typing in a keyword to find the correct section.
With all that said, let’s dive right in.
1. Initial Setup – How to set up the Strelok App
When you first get the Strelok app, and before you take a single shot, you will need to set up the app to suit your needs and the units of measurement you will be using. You will then have to enter your rifle data into the app too.
In this part of the guide, you will be setting up the following:
- Strelok App Settings
- Strelok App Measurement Units
*The following settings are optional and will not be covered in this guide:
- Language
- Weather Stations
- Bluetooth 2.0 Devices
- Keyboard Settings
Strelok App Settings:
To get to the Strelok App Settings, simply tap on the gear icon at the bottom left of the main screen from the home page. You will be presented with the following settings:
Consider powder temperature
Hotter powder burns faster and results in higher bullet velocities.
A study by Sierra Bullets found that an increase in temperature of 44.5°F increased the muzzle velocity of a .308 from 2451fps to 2500fps. That’s an increase of 49fps and quite a significant difference.
By enabling “Consider powder temperature”, Strelok factors in the temperature of the powder in the cartridge where a 1°F of temperature increase will increase the muzzle velocity by approximately 1 fps.
Show SMOA instead of MOA – What is SMOA?
SMOA is “Shooters Minute of Angle”. SMOA is similar to MOA, but not as precise. A true MOA is 1.047 inches at 100 yards while an SMOA is rounded off to 1.0 inch at 100 yards. For long-range and precision shooting, I recommend that you not use SMOA, and use MOA instead.
Add vertical deflection of crosswind to results.
Crosswind can cause a vertical deflection to the trajectory of the bullet. A 10.6mph crosswind on a 308 Winchester 175gr bullet fired at 2550 fps can add 4.64 inches of vertical deflection at 600 yards. This value is approximately 10% (or slightly less) of the “spindrift” horizontal deflection. Most shooters recommend enabling this.
Add spindrift to results.
The spin of the bullet will add a horizontal deflection to the bullet’s trajectory. A right-hand twist barrel will cause the bullet to drift right, and a left-hand twist to the left. It is recommended that this be enabled.
Add Coriolis effect to results.
The Earth’s rotation can have an effect on the bullet’s flight path. Vertical or horizontal depending on where on the Earth you are and the direction you are shooting. This effect is only really noticeable at distances further than 1,000 yards. If you are shooting that far, then be sure to enable it.
Use camera for slope angle
This allows your camera to point at the target to calculate the slope angle from the main screen. It is a handy feature, so keep it enabled.
Use U/D and L/R instead of +/-
Here you can decide whether to read the adjustments as U/D (up or down) and +/- (plus or minus). U/D is simpler to understand for all shooters, and it is recommended.
Show clicks in 1 3/4 layout
If your scope is in MRAD, then I recommend leaving this disabled. If your scope is in MOA, then I highly recommend you enable this function.
What exactly is “Show clicks in 1 3/4 layout”? Instead of having to dial and count all the clicks, when working in MOA, it is more intuitive for many shooters to think and work in MOA and fractions of MOA.
In the example below, with “Show clicks in 1 3/74 layout” disabled, the shooter must count each click, or divide the clicks by 4 or 8 (depending on if scope clicks are 1/4 MOA or 1/8 MOA), to visually dial in the adjustments, this can be confusing and time-consuming on the fly.
With “Show clicks in 1 3/74 layout” enabled, the shooter can quickly see that they must rotate the turret to “x” MOA and then add the appropriate amount of clicks.
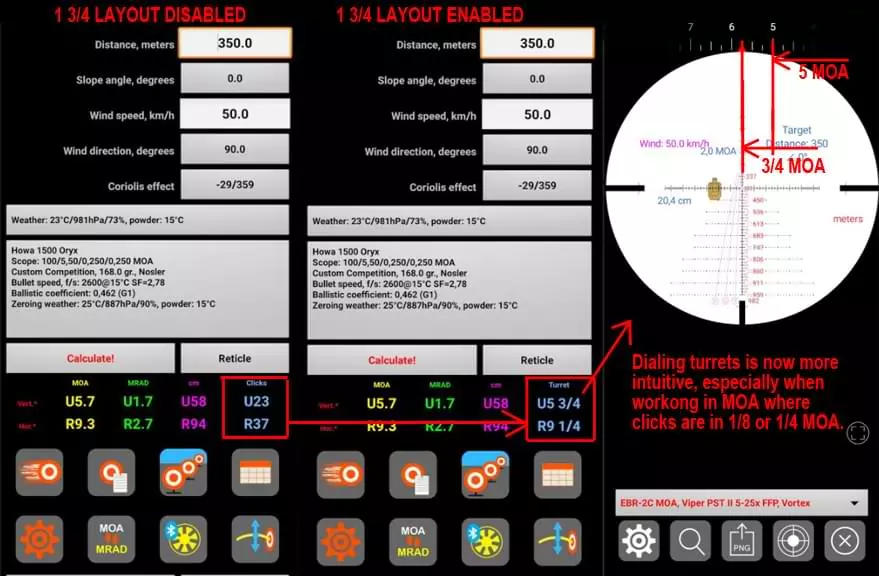
In the example above, with “Show clicks in 1 3/74 layout” disabled, the shooter must count each individual click, which is difficult to do under stress and easy to make a mistake. They could also divide the clicks by 4 to get the MOA needed and rotate the turret quickly to that number. They can then add the fraction of MOA to that to get to the total adjustment. The latter would be a better option but takes longer.
With “Show clicks in 1 3/4 layout” enabled, the shooter immediately gets the amount of MOA to dial, then the fraction of MOA to add in one string of numbers. This saves a lot of time and avoids any confusion by division etc.
WeatherFlow WINDmeter support
If you have a WeatherFlow WINDmeter, enable this to connect the device and receive live wind speed updates to your shooting solutions.
Disable screen timeout
This will prevent your screen from timing out and locking or switching off. This can be a pain in the ass while shooting, so it helps to have this enabled.
Turret step is equal to scope click.
If enabled, the virtual turret on Strelok’s “Reticle” screen will match your rifle scope.
No sound effects
This is straightforward. Enable this setting to turn off the app sound effects.
Contrast color scheme
This will change some colored text on your main screen to white, making it easier to read, especially in direct sunlight. I recommend that you enable this.
I have Vectronix Rangefinder
If you have a Vectronix Rangefinder, then you can have the app automatically enter the distance each time you use your range finder to measure your target distance.
Strelok App Measurement Units:
To get to the “Measurement units” screen, scroll down to the bottom of the same settings screen and click on the “Measurement units” button. You are given the option to either choose imperial units, metric units or manually enter each unit one by one. I recommend that you enter the units manually to match the units to your preference and the measuring equipment you use.
Distance units
Here you enter the unit of measurement for distance that you want the app to use. If your scope is MRAD, then I recommend that you use meters, and if your scope is MOA, I recommend that you see yards. This will make your calculations easier when ranging targets and making adjustments.
Inches or centimeters
For the same reason as with “distance units, ” I recommend you use cm if your scope is MRAD or inches if your scope is MOA.
Scope height units
This is not really important but refers to the unit of measurement used when entering your scope height in your scope settings when setting up your rifle. Your scope height is the distance from the center of the riflescope to the center of the bore.
Speed units
This is going to be based on preference. Ideally, you want this to match the settings on a chronograph if you have one.
Temperature units
Use what is native to your area. In most united states, you will want to use °F, because that is the format you’ll get from most weather stations and fellow shooters. In other parts of the world, °C is more native and is going to serve you better. Either way, you’ll want to make sure that your thermometer or Kestrels units match the unit of measurement in these settings.
Pressure units
Here you need to set it to mmHg, hPa (mb), PSI, or inHg. For the same reasons as the temperature units, you’ll want to choose the unit most native to your area, making sure that whatever measuring devices are set to the same unit of measurement.
Wind speed units
Again, you’ll want to use the same unit that is used natively. You’ll find yourself on the range, hearing wind calls from fellow shooters, and if you use the same units, you can save yourself a lot of guesswork and error.
Altitude units
Use your native unit here too, either Meters or Feet.
Slope angle units
Here you will use either Degrees or Cosine. Unless you cannot use your phone’s camera to measure the angle through the app, you will want this to match whatever measuring device you are using to measure the slope angle. For example, if you are using a compass, then you should use Degrees.
Energy units
Energy units are either Joules or Foot-pounds (ft-lb). Use whatever unit you and fellow shooters use and understand the most. This refers to the bullet’s energy calculated by the bullet’s weight and its velocity (speed).
Bullet weight units
Most bullets are weighed in Grains, which is true worldwide, so I recommend that you use grains to save yourself from doing any conversions or getting confused.
Bullet length units
This is the length of the bullet itself from tip to tail. Use the unit of measurement that is printed on the packaging or published on the bullet manufacturers’ website. Or, if you are measuring your own bullets, then match this to the units of the measuring device you are using.
Bullet diameter units
Same as the bullet length, match this unit to the unit used by the manufacturer of your bullets or the units on the measuring device if you measure your bullets yourself.
2. Entering the rifle, ammunition, and scope data into the Strelok App
In this section, you need to enter some information about your rifle, your scope and your ammunition.
Entering the scope data
To get to your scope settings, from the main screen, click in the large box that shows rifle, scope and cartridge information. You will now be on the rifle settings, from here click on the first box that gives scope information. You should now be on the scope setting page as shown below.
You are presented with the following settings that I will cover in the section.
- Zero Distance
- Scope height
- Vert. click
- Hor click
- Scope click units
- Scope reticle
- This reticle is in First Focal Plane (FFP)
- Min. magnification
- Min. magnification
- Max Magnification
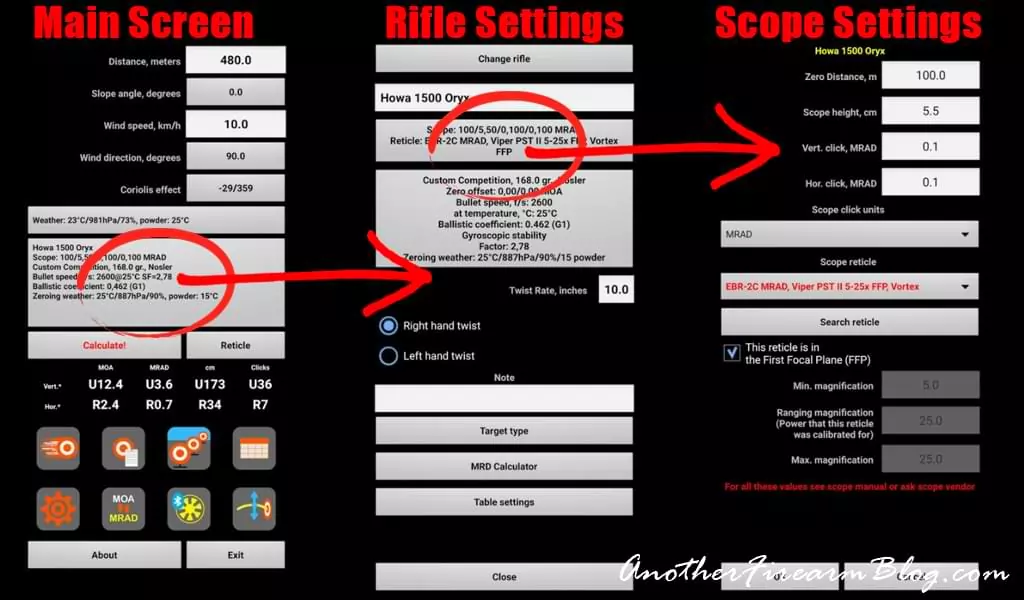
Zero Distance
The first setting under scope data is the zero distance. Zero distance is the distance at which you sighted in your rifle. Most rifle setups will be 100 yards if you use MOA and imperial units or 100 meters if you use MRAD and metric units. However, you can zero your rifle at any distance, and the app will still work. Just make sure you enter the correct zero distance here.
Scope height
This is the distance between the centerline of the rifle’s bore and the centerline of the rifle scope. For best results, use calipers to measure this. For even better results, use the following technique.
- Measure the outside diameter of the objective end of the rifle scope, and divide that by 2.
- Measure the barrel’s outside diameter directly below the objective end of the rifle and divide that by 2.
- Measure the distance of the gap between the barrel and the scope.
- Add 1, 2, and 3. This is your “Scope height”.
Vert. click
Here you enter the value each click equals on your scope turrets. Most modern MRAD scopes will be 0.1 MRAD, and most MOA scopes will be 0.25 (1/4) MOA. There should be markings on your scope’s turrets that specify what each click represents.
Hor click
This is the same as the above Vert. Click but for the horizontal adjustment turrets. This will most likely be the same as above. Most modern MRAD scopes will be 0.1 MRAD, and most MOA scopes will be 0.25 (1/4) MOA. There should be markings on your scope’s turrets that specify what each click represents.
Scope click units
Here you need to set the unit of measurement of your scope. For most scopes, it will be between MOA and MRAD, and your rifle scope will have markings that display this.
Scope reticle
This nifty feature allows you to choose the same reticle of your rifle scope. Strelok has a massive database of most of the modern riflescope models. Click “Search Reticle”, type in the first few letters of your scope make, and scroll until you see your scope model, then select it.
This reticle is in First Focal Plane (FFP)
You need to tell Strelok if your scope is FFP (First Focal Plane) or SFP (Second Focal Plane). Look at the packaging or user manual to find out what your scope is. You can also look online by searching your scope make and model on Google and visiting the manufacturer’s website.
To determine if your scope is FFP or SFP, simply look through the scope while adjusting the magnification. If your reticle stays the same size, your scope if you SFP, if your reticle grows as you zoom in, you have an FFP rifle scope.
Min. magnification
If your scope is SFP, you need to tell Strelok what the minimum magnification of your rifle scope is. This is the magnification when your scope is completely “zoomed out”.
Ranging magnification
This is not required if your scope is FFP. This is where you enter the magnification that the scope reticle is calibrated for. You can find this in the user manual or by looking at your manufacturer’s website. The ranging magnification on most rifle scopes is set at the scopes maximum magnification or “full zoom”.
Max Magnification
This is also not required if your scope is FFP. This is the scope’s magnification when you are entirely “zoomed in”.
Entering the bullet and cartridge data
The app needs some information about the type of ammunition you will be using. There are presets built into the app that covers most types of bullets and scopes. However, you should still understand how to enter the rifle, scope, and ammunition data into the app manually and what these values mean.
To get to the Cartridge Settings screen, click on the large box with information about your rifle. This will take you to the rifle settings screen. From this screen, click on the large box with information about your “zero offset”, “bullet speed”, “ballistic coefficient” etc. This will take you to the cartridge settings screen.

Change cartridge
This is where you can build profiles of different cartridges and save them for future use. This feature is handy if you have different loads of cartridges for various purposes. For example, one type of cartridge for hunting and another for long-range shooting. By tapping on “Add” in the “Change cartridge” menu, Strelok will save your current cartridge settings and add them to a list of presets.
Cartridge name
Give your cartridge profile a name. If you are loading your own ammo, use something descriptive of your specific load, like: “Sierra Matchking 168gr, Lapua Brass, S&B Primer, 44.5gr N150”. When you add your cartridge profile to the “change cartridge” presets, Strelok will save it under this name.
Bullet length
This is the measurement of the actual bullet, from tip to tail, and not the measurement of the entire cartridge. You can get this information on the packaging of your bullets or from the manufacturer’s website. If you can’t find this information, then you will need to measure it with a set of calipers.
Bullet diameter
This is the diameter of the bullet. This is also available on either the box the bullets came in or on the manufacturer’s website. This is essentially the caliber of the bullet.
Bullet weight
The bullet weight should be clearly shown on the product packaging. If not, then you can search the manufacturer’s website, or alternatively, weigh them if you have the appropriate scale. If you do weigh them, use an average of 10 bullets to give you a better result.
Ballistic coefficient – What is “Ballistic Coefficient?
The ballistic coefficient is a factor that is used to measure how aerodynamic a bullet is. There are two formats used in the shooting, G1 and G7. You should set which format your bullets are measured in below in the “drag function” setting. This value should be given on the box that the bullets came in. Alternatively, you should be able to find the value on the manufacturer’s website. The ballistic coefficient is extremely important.
- Multi BC
- As the bullet slows down along its flight path, its ballistic coefficient changes with its velocity. Some manufacturers, like Sierra Bullets, publish multiple BC’s for different bullet speeds for more accurate calculations. If you have this information on hand, then I highly recommend that you use it. To use Multi BC, simply tap on the “Multi BC” button, then enter each Ballistic coefficient and its corresponding bullet speed into the list.
Drag function
This is the format of the ballistic coefficient that you entered above in “Ballistic coefficient”. For most bullets, it will be between G1 and G7. Be sure to check that you are using the correct format by reading the packaging the bullets came in or by visiting the bullet manufacturer’s website.
Bullet speed (This information will be entered at the next step)
You can enter the published bullet speed as per the packaging or manufacturer’s website if you like. However, you won’t know the exact speed of the bullet fired in your rifle until you actually measure it with a chronograph. This should be done in the next step when you zero your rifle.
Zeroing weather (This information will be entered at the next step)
You will also only know this when you zero your rifle, so we will save this for the next step.
3. Zeroing your rifle and entering zero data into the Strelok App
OK, finally, it’s time to go shooting! Here you will be doing two things. You will zero the rifle at the preferred distance and enter your “Zeroing Weather” into the app. You should also measure your muzzle velocity.
You will need at least a range where you can shoot 100m or 100 yards. You will need to zero your rifle and measure the muzzle velocity for the particular ammunition you will be using for long-range shooting. Once you have done both, be sure to enter the “zeroing weather” (temperature, pressure, and humidity) into the app. It would also be wise to write down this information in your shooting notebook.
Bullet speed
You can either enter the estimated bullet speed printed on the box of the ammunition, or you can measure the speed with a chronograph. Make sure you measure at least 5 shots and take an average speed. Pay close attention to the ES (Extreme Spread) of the ammunition you are using. The ES is the difference between the fastest and slowest speed out of your five shots. If it is too high (20fps or more), you will not get consistent results.
Zeroing weather
Because atmospherics that affects the air density is always changing, Strelok needs to know what the weather conditions were when you zeroed your rifle. Using this data and the weather data you enter when you are shooting, Strelok can make corrections for the change in weather. Be sure to update the “Zeroing weather” conditions every time you zero your rifle.
- Enable zeroing weather
- Always have this enabled. It will allow you to enter the “zeroing weather” conditions.
- Temperature
- Cold air is denser than hot air, and the higher air density will have more drag on the bullet, slowing the bullet down faster. To compensate for this, enter the ambient air temperature here. While shooting, be sure to update this throughout the day.
- Pressure
- The higher air pressure also increases the air density, which will have more drag on the bullet, causing it to slow down faster. Enter the air pressure here to compensate for this. You should get this in real-time at your shooting location using a Kestrel or similar weather meter. If you do not have access to a meter, you can use your nearest weather station data online.
- Use internal barometer
- Some modern devices have built-in barometers that can measure air pressure. If your device has this functionality, then check this box. The Pressure value above will automatically be updated for you.
- Humidity
- Humid air is less dense than dry air, this might be the opposite of what you’d first expect, but it’s true. Water has a lower molecular weight than nitrogen and oxygen, which means the higher the humidity, the lower the air density, which slows the bullet down less than dry air would. To get your humidity, you will have to use a Kestrel or similar weather meter. You can also use the value from your nearest weather station. Humidity has the least effect on a bullet than anything else, so don’t stress too much if you can’t get it exact.
- Powder temperature
- This is enabled or disabled in the app settings under “consider powder temperature. As I mentioned, an increase of 1° F in powder temperature can increase a bullet’s muzzle velocity by 1 foot per second. This is because hot powder burns faster, which propels the bullet faster down the bore.
- To get the most out of this feature, keep your ammunition in the shade and simply use the ambient air temperature for this. Alternatively, if you want to be a geek about it, you can use a temperature gun to measure it precisely.
- METEO
- The METEO feature in Strelok allows you to get a weather update from the internet. If you have an internet connection, simply tap on METEO. It will take you to another screen, where you wait for a weather update. After a few seconds, it will show the weather conditions at your nearest weather station. If you are happy with the conditions, simply tap on the “Use these values” button. Strelok will automatically enter all the weather values based on this update. While convenient, this will not be as accurate as measuring the weather conditions manually at your exact location.
- Select Bluetooth weather station
- This is the small icon next to the METEO button. You can use this function if you have a Bluetooth-compatible weather meter. If connected, Strelok will automatically get the weather conditions from the meter via Bluetooth.
Twist Rate and Direction
This is the only data that Strelok needs about your actual rifle. The twist rate is when the rifling in the barrel twists and is denoted as 1:10 or 1:9, for example. Typical twist rates for .30 caliber rifles are 1 in 10, for example, which means the rifling completes one revolution for every 10 inches of length.
It is not usually necessary to measure your rifle’s twist rate as it is generally published in the manual or the rifle manufacturer’s website. If not, a good gunsmith will be able to tell you the twist rate by giving him your make, model, and caliber of the rifle.
If your rifle barrel is a 1:10 twist, you will simply enter the value “10” into Strelok. You should also tell the app the direction of the twist, right or left. Simply tap on the appropriate check box for this.
Congratulations, you have completed the basic setup of the Strelok app. Next, you need to know how to use the app effectively in the field.
4. Using the Strelok App in the field, correctly.
OK, I know you are getting excited, but hold up, you’re not quite there yet. While some of the information needed on the app’s main screen seems straightforward, there is more than meets the eye.
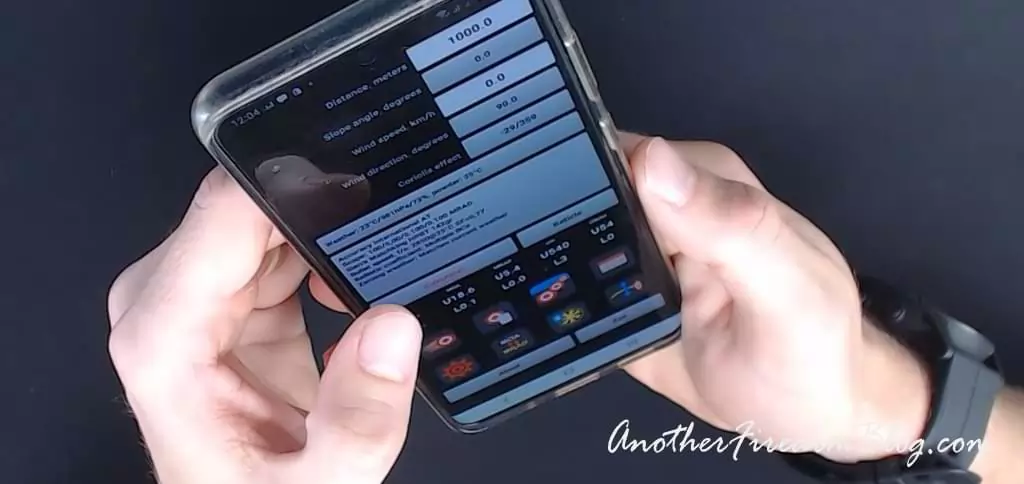
Distance – How to enter the distance in Strelok
The first line on the home screen is distance. This is the distance from the muzzle of your rifle to the target. Use your range finder, or range the target using your tactical reticle to find the range of the target if it is not marked or if it’s not a known distance target.
Suppose you cannot measure the slope angle to the target as required in the following setting. In that case, you can simply enter the HCD (horizontal distance component) here instead of the LOS (line of sight) distance. Most modern laser range finders can be set to give LOS as well as HCD distances
Slope Angle – How to enter the slope angle in Strelok
The input is the slope angle to your target. You can either enter the slope manually in degrees or use your phone’s camera to point the crosshair to the target, and the app will measure the slope angle for you. Note: If your range finder has an HCD (Horizontal Component Distance), you will not need to enter anything for slope angle and use the value 0.
Wind Speed – How to enter wind speed in Strelok
Next is wind speed. Here you will enter your wind speed in the unit of measurement that you set in under “settings”. When entering the wind value, make sure you use the same unit of measurement in your Strelok Pro App as you are using in the Kestrel (or other devices) to measure the wind speed. If you do not have a Kestrel or wind speed measuring device, you should use the “Beaufort Scale for Wind Speed Estimation”. It is essential to take note that it’s not only the wind where you are standing that matters, but also the wind speed and direction all the way to your target.
Wind Direction – How to enter wind direction in Strelok
Now you need to tell the app which direction the wind is blowing. Here you tap on the entry, then a clock face will come up. Point the 12 at the target, and using your finger, drag the direction indicator to where the wind is blowing from. Once that’s done, tap “OK.”
Weather – How to set up the weather in Strelok
This tab is where you input your current weather conditions. It is different from your “zeroing weather” which falls under the app settings. This forms part of Strelok’s shooting solution calculations, so you should update the weather conditions here as they change throughout the day.
- Temperature – You need to enter the current air temperature. You can get this information from your Kestrel if you have one. If you don’t, use an ordinary thermometer or check the weather report for an estimate.
- Air Pressure – When entering air pressure, you have three options. You can either enter the pressure manually from a measurement taken from your Kestrel or a weather station, or use your phone’s internal barometer, or calculate the pressure using your altitude if you know it.
- Manual Entry – Use your Kestrel to measure the air temperature or find the air pressure online or at your nearest weather station.
- Use internal Barometer – Some devices have an internal barometer that can measure air pressure. If your phone has this feature, then check the box “Use internal barometer”. The app will automatically fill in the air pressure for you.
- Calculate pressure from altitude – There is also a tool to calculate pressure from your altitude if you know what your altitude is. If your phone has GPS, you can tap “Get from internal GPS” to get your altitude. Tap “Calculate!” and an estimated Pressure will be displayed. Now click “Use this pressure” for the app to use this value.
- Humidity – You should also enter the current humidity at your location, which you can get from your Kestrel or your local weather station. Humidity has less of an effect on the bullet’s trajectory, so an estimate will be fine.
Use Density Altitude
What is Density Altitude? Density altitude is a number used to give a value to the air density relative to altitude. This figure is derived using air temperature, pressure, and humidity. If you enable “Use Density Altitude”, you will not have to enter air pressure or humidity values. Please do not simply enter your altitude here. Density Altitude is not the same as “Altitude”.
Suppose you know the current Density Altitude at your location. In that case, you can enter it here instead of entering pressure and humidity.
METEO
By tapping on the “METEO” button, you can get your current weather conditions from the internet if you have a data connection. This data will not be accurate as it will be at the position of your nearest weather station. It would be better to manually enter the weather conditions by measuring them at your current location.
To use the METEO function, simply tap on the “METEO” button, then wait while the app downloads the current weather conditions. Once downloaded, click “Use these values” and the app will automatically enter them into the weather conditions. Now click close to return to the “Weather” screen.
Select Bluetooth weather station
If you have a Bluetooth-compatible weather station, you can link it to the Strelok Pro app. Once linked, your app will have a live feed that constantly updates weather conditions automatically.
You have now entered all the weather conditions the app needs to calculate a firing solution. Click “OK” at the bottom of the screen to return to the “Home Screen”.

Ok, great job.I’m all set up. Now how do I read and adjust the reticle. Do I just hold on the lines or do I have to rotate the turret at the top? As I zoom distances seem to change. I might be to old for this. Hope you reply. Thanks.
Dan
Hi Dan. Hahaha, you are never too old to learn. Are you using the same reticle in the Strelok that is in your scope? What scope do you have? You can hold on to the lines, OR you can adjust the turrets. If you adjust the turrets, then you aim with the crosshair center on the target.
If you zoom, and the distance seems to change, then you probably have a second focal plane scope. If you have a second focal plane, then holding the adjustments will only worked at one magnification, usually max of the scope.
I accidentally stumbled on a setting and want to know how to use it…… main screen after you calculate, if you tap on “clicks” it changes to “Turret”. for example on clicks it reads U 15 for up 15 clicks. if you tap and Turret comes up it reads U3 2/4. What does this mean in relation to elevation change?
Hey Bill, great question, I covered this under “show clicks in 1 3/4 layout”. It can be enabled or disabled under your settings from the home screen.
If your scope is in MRAD, then I recommend leaving this disabled. If your scope is in MOA, then I highly recommend you enable this function.
What exactly is “Show clicks in 1 3/4 layout”? Instead of having to dial and count all the clicks, when working in MOA, it is more intuitive for many shooters to think and work in MOA and fractions of MOA.
In the example below, with “Show clicks in 1 3/4 layout” disabled, the shooter must count each click, or divide the clicks by 4 or 8 (depending on if scope clicks are 1/4 MOA or 1/8 MOA), to visually dial in the adjustments, this can be confusing and time-consuming on the fly.
With “Show clicks in 1 3/4 layout” enabled, the shooter can quickly see that they must rotate the turret to “x” MOA and then add the appropriate amount of clicks.
In the example above, with “Show clicks in 1 3/74 layout” disabled, the shooter must count each individual click, which is difficult to do under stress and easy to make a mistake. They could also divide the clicks by 4 to get the MOA needed and rotate the turret quickly to that number. They can then add the fraction of MOA to that to get to the total adjustment. The latter would be a better option but takes longer.
With “Show clicks in 1 3/4 layout” enabled, the shooter immediately gets the amount of MOA to dial, then the fraction of MOA to add in one string of numbers. This saves a lot of time and avoids any confusion by division etc.
Perfect explanation! Since I’m usually in MRAD, it just didn’t click! I really should have figured that out on my own but I’m glad you are here to help!
Thanks again!
Glad I could help. It also took me a while to grasp the concept. Take care
Thanks for your input. I was confused on a couple of things.
I have been using Strekok Pro for a year or so. I have trouble seeing it and I can’t find the function where I can change contrast.\Perhaps it is not there on the IOS app. I hope you can tell me where the function is.
Hey bro. Just wanted to thank you for taking the time to write this very helpful guide. It covers a lot and I found it useful
I guess I’m missing something….. would like to use the phone camera for angle measurement but after selecting, I just get a blank screen! What am I doing wrong>
I figured it out….. was a permission issue and it’s solved! Thanks again!
Hey Bill, sorry for the late response. Glad you figured it out. Perhaps that’s a point I should cover in this article.
The “Send by email” tab doesn’t seem to function on the Strelok Pro version like the “Share as xls” tab does. My interest is Sending the table chart as it is displayed on the screen like the older version of Strelok. Any ideas on how to get it to launch?
I am glad to have been a help! Thanks for taking the time to leave a comment. Take care.
Could you comment on using the “Zero offset” function?
This is really, really good stuff. You’ve given us the fundamentals and they are timeless even if details of operation change. Thanks so much.
You are very welcome, glad I could help!
Excellent summary/ tutoria!
Been using Pro for about 3 years. One thing I ran across that might help others is a situation I ran into this last week. When looking at the reticle display, all my holdover yardages disappeared. Turns out there is a little red circle in the upper LH corner of the reticle display. Really tough to see and easy to not even notice.
When you touch it your yardages disappear. When you touch it again they return. Never noticed that after all these years. Great app and great doc!
Well done.
When I go to slope angle degrees. I understand moving the cross hair target dilly to give you the slope degree, but you can also move it left and right. What is that